Generating Perlin Noise
Andreas J—nsson, February 2002
What is Perlin Noise?
Perlin noise was designed to have the following properties:
- apparent randomness, it should look random to the human eye
- reproducable, meaning with the same input it will always give the same output
- smooth transition between values, meaning no sharp edges
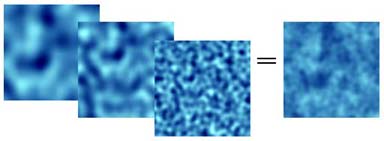
Perlin noise can be used in any place where you need a smooth noise function, for example to produce procedurally generated textures, generate height data for terrain, etc. Perlin noise can be generated in any dimension desired, for example if you wish to use perlin noise to generate an animated volumetric fog effect in your game you would use a 4 dimensional perlin noise to generate the fog data. More interesting effects are obtained by combining several layers of perlin noise with different scaling factors. Only your imagination sets a limit for what you can use perlin noise for.
Perlin noise was invented by Ken Perlin, who won an Oscar award for it. You can find Ken Perlin's own description of the algorithm at his site or at www.noisemaker.com.
How is perlin noise genereated?
We will take the theory in 2D as it is easier to explain, but you will see that there is very little difference for generating perlin noise in other dimensions. When we want to generate a perlin noise value for a point we start by finding the 4 surrounding points that are placed on integer values.
Then we will compute a value for each of these surrounding points. This is done by associating a gradient vector with each of the points. The important part here is that it is always the same gradient vector chosen for the same point. This is usually accomplished through some sort of look-up table.
Now that we have 4 gradient vectors and 4 points surrounding the input point we will create vectors from the 4 points to the input point. The dot product of the 4 vectors and the gradients are then taken to generate a noise value for each of the 4 points surrounding the input point. What this dot product makes is that the farther along the direction of the gradient vector the input point is the larger the value will be. Also notable here is that if the input point is exactly on an integer value it will have a noise value of 0.
To get one final value at the input point we will interpolate the values produced by the dot product. To get a smooth transition between integer values we will use cubic interpolation which is done with the following formula: v(u) = v(0) - (3u^2 - 2u^3)*(v(0) - v(1)).
Of course this interpolation only takes care of two values, we have four so we need to do yet another interpolation, giving a bi-cubic interpolation. All in all we will make three cubic interpolations, the two first to interpolate along the x-axis and the third to interpolate along the y-axis.
How to implement perlin noise
The first problem we need to deal with is how to choose the gradient vectors so that they are always the same for the same coordinates. The simplest way is to use a look-up table so let's do that. Of course, we can't make this look-up table infinitely large so we will make only a small table and let the coordinates wrap around the dimensions of the table. We still have a problem of memory use, suppose we want the noise to repeat at lowest 256 units, which is a reasonable number. This look-up table will use approximately 0.5 MB of memory, which I for one think is rather much. I will show another way here that have a lot smaller memory foot print.
First we will create an array of length 256 to hold our gradient vectors. These arrays are initialized with random vectors inside the unit cube, (-1,-1) to (1,1). Now we need a way to make this 1 dimensional look-up table to function as if it really has 2 dimensions. This we will do with yet another array that we will name the permutation table. The permutation table is filled all the values with between 1 to 256, only the order that they appear is randomized.
// Initialize the permutation table
for(i = 0; i < SIZE; i++)
  p[i] = i;

for(i = 0; i < SIZE; i++)
{
  j = rand() % SIZE;

  nSwap = p[i];
  p[i]  = p[j];
  p[j]  = nSwap;
}

// Generate the gradient look-up tables
for(i = 0; i < SIZE; i++)
{
  gx[i] = float(rand())/(RAND_MAX/2) - 1.0f;
  gy[i] = float(rand())/(RAND_MAX/2) - 1.0f;
}
When the noise value for a point is to be computed the first thing we need to do is to find the 4 points surrounding the input point as described above. This is as simple as finding the largest integer smaller or equal to the input value, here we have the first point, the second we get by adding one.
To choose the gradients to use we first permutate these coordinates using the permutation table. For every coordinate we start by permutating the x value, then adding the y value and finally permutating again, this will assure that we get an indexing into the array of gradient vectors that is different along the two axis.
// Compute the integer positions of the four surrounding points
int qx0 = (int)floorf(x);
int qx1 = qx0 + 1;

int qy0 = (int)floorf(y);
int qy1 = qy0 + 1;

// Permutate values to get indices to use with the gradient look-up tables
int q00 = p[(qy0 + p[qx0 % SIZE]) % SIZE];
int q01 = p[(qy0 + p[qx1 % SIZE]) % SIZE];

int q10 = p[(qy1 + p[qx0 % SIZE]) % SIZE];
int q11 = p[(qy1 + p[qx1 % SIZE]) % SIZE];
Now that we have the gradient vectors to use for each of the 4 points, we will do the dot product to generate the values. First create a vector from the input point by subtracting the corner points. Then do the dot product simply by multiplying the x:s with x:s and y:s with y:s, then adding the results.
// Computing vectors from the four points to the input point
float tx0 = x - floorf(x);
float tx1 = tx0 - 1;

float ty0 = y - floorf(y);
float ty1 = ty0 - 1;

// Compute the dot-product between the vectors and the gradients
float v00 = gx[q00]*tx0 + gy[q00]*ty0;
float v01 = gx[q01]*tx1 + gy[q01]*ty0;

float v10 = gx[q10]*tx0 + gy[q10]*ty1;
float v11 = gx[q11]*tx1 + gy[q11]*ty1;
Finally we do the bi-cubic interpolation to get the final value for the noise function. As described above we first interpolate along the x-axis and then interpolate the new values along the y-axis.
// Do the bi-cubic interpolation to get the final value
float wx = (3 - 2*tx0)*tx0*tx0;
float v0 = v00 - wx*(v00 - v01);
float v1 = v10 - wx*(v10 - v11);

float wy = (3 - 2*ty0)*ty0*ty0;
float v = v0 - wy*(v0 - v1);
Disadvantages of the perlin noise
One major disadvantage of the perlin noise function is that it is extremely slow for higher dimensions. There is unfortunately not very much to do about this, the only savior is to minimize the number of times the function is called.
Another disadvantage that might not be obvious is that the noise function always returns 0 at integer values. Although this is not noticable on static images it is very apparent on animated images. I made a 3D perlin noise function and rendered it on a 2D texture map while moving along the z-axis, this had the effect of a pulsating map. This because every time the z value was integer there where many values around 0, while the z where between integer values there where more randomness.
Fortunately there is a simple solution for this. What you do is that you rotate the coordinate system before calling the noise function, this has the effect that not many samples will be on integer values at the same time.
Conclusion
I have hopefully given you an understandable explanation for how to implement perlin noise. Now it is up to you to apply this knowledge in your projects. If you have any comments or questions on this article you are welcome to send them to me.
Further reading
Making Noise, by Ken Perlin